
Getting creative with your floor plan!
- Whispering Wind Ranches
- Mar 22, 2023
- 9 min read

When going from big to considerably smaller and even to tiny, its super smart to plan plan plan.. and then plan some more. I use as many free design tools as I can online, especially ones I can 3D model so I can actually place myself into the space. There are lots of other things, besides aesthetics, to think about when planning your tiny (or small) house, like smart electrical placements, plumbing placement, your separation and routing of gray water, if your place will have a second floor and how to access that with the smallest amount of space or the smartest use of the space. Everything that you can have a multipurpose use is also better. So today in this blog I will touch on a few of the things I have found through experience to be most important.

Plumbing walls. In a much smaller house, it is extremely important to think about where water will enter and exit your home with the least amount of plumbing connections and pipes going through walls. I always try to have my bathroom and kitchen walls adjoining each other and my laundry also super closeby or even shared space with the kitchen or bath. In my new design studio/office/owners quarters space I am building. Currently in my new space, all of our interior and exterior walls are log. So our interior walls have no cavities. The only exception we will have is building a cavity in one wall with the shower to run all the plumbing to the shower head/faucet. Our exterior logs will be insulated by attaching 2x4x8 to the exterior logs and them filling the cavity will a wool batted insulation and then running the wiring and plumbing through the exterior walls only; with the exception of the toilet and the shower, all of our water in and out will go through the exterior walls and we will be utilizing PEX to do so. For our bathroom our shower (shower head/faucets) and sink (in and outgoing water) will go through a cavity. The composting toilet will go in and out of the floor. However, since space is small (6.5x 6,5)we will be making the entire bathroom a wet room.
The Wet Room. As previously mentioned, as our bathroom is extremely small and one of us is fully disabled, we will be making the entire bathroom a wetroom with a curbless shower. At this current time, my spouse does not need to use a walking or standing aid or a wheelchair, but in the future that will likely change so we are just building a curbless system now without a door for future needs. We will also be utilizing a barn door ( on every interior door in this space), more for function than look, as it's easier for a person who is disabled to slide a door and because we do not want to waste space in such an already small room. Since the area will be "wet" we purchased an antique wall mounted porcelain over cast sink in which the plumbing will come in and out of the pocket we need to create in the wall for the shower faucets and head. This way not only will we have a way to hide the plumbing but at a future time when he does become walker or chair bound, he will be able to roll or walk with his walking aid right up to the sink. The toilet will be across from the sink, that way we will have a grab handle plus enough room in the center of the room for him to get turned around. This room (as well as the rest of the home) will have hydronic wood floor heating. For the main portion of the bathroom, we are doing a cement tile floor but in the shower area a marble herringbone pattern so we have more grout area to help with the non-slip. The walls will be a 4x16 inch subway tile on all 4 walls up to 8 feet high, then the remainder, including the ceiling , will be painted with a white paint meant for kitchens and baths. We have changed this plan at least 5 times, and it will likely keep changing until we are sure everything is going to work how we want it. Being a wet room there will be no storage in there, however, how much storage can you really put in a 7.5 by 7.5 ft space when you are putting toilet, shower and sink? We have a really nice long but narrow cabinet with glass doors we will have outside the bathroom. So there will be storage for towels, bathroom supplies, soap etc outside. Here's a few 3d renderings. You can do these configurations free.. there's countless websites.


The Great Room. Our "front room" will consist of a Kitchen on the right and dining and living combination on the right but the spaces will hopefully blend together well. Again we have changed the plan here a number of times and we are still deciding whether to put a full size fridge in our kitchen or to leave the full sized fridge in the pantry with an under counter fridge for drinks and everyday items. We are 100% off grid and we have yet to find what we feel is a reasonably priced and reasonably energy efficient under counter fridge. From our research, the under counter fridges are not very (or as efficient) as full sized models with some of them (even the energy star models) taking more kwh per year than the full sized. So I think what we have decided on is to put a small (24inx24inx72in) energy star fridge in our kitchen. It will take the approximate floorspace as a dishwasher (which we also will not have). We also recently had to make some adjustments for a stove. We planned on a 40 inch but then we came across a 36 inch 1947 Wedgewood 4 burner with griddle a steal at $400. It's in great shape but needs a good cleaning! I also came across a 36 inch farmhouse fireclay sink at a local liquidator shop ($200) so I had to reconfigure cabinets to accommodate. I have found during this process that we have to have the ability to be fluid, especially when you are attempting to get "deals" on what items you can. I'm glad we decided on such a utilitarian floor model. It has been helpful in allowing us to move things around without too much challenge.. We will do a small Island. 4x5 with an over hand on 3 sides, so we can have some bar seating and a little storage. Our countertops will be butcherblock, sourced from the ranch and hand crafted, but the island will be some solid surface. I will need a place to bake, can, butcher and craft. We decided to mimic the color scheme of our current Tiny... we love the colors so much. Being a log house will be some challenges. We will have to find a natural "break" to change from Kitchen color to living color.. I think we have found that. Also because our backsplash tile will need to have mastic.. (as well as the bath I forgot to mention this earlier)we will affix a thin piece of backer boards to the log so we will apply the mastic and tile to the backer board and that will be screwed into the wall.... so if or when down the road we wish to change the tile out, we won't be scraping mastic off of our logs or our tongue and groove. We will paint the tongue and groove however, and leave the logs stained. I think it will give a nice contrast and the interior stain color we selected will compliment the floor and the colors we have chosen (greens). I am also painting the tongue and groove ceilings but leaving the purlins stained. Some people will cringe when I tell them this. They think I should stain all real wood surfaces; but then we will have wood ceilings, wood purlins, wood walls, wood cabinets and wood floors. I think it will be too much wood and I also think since this house is so small the white will make it appear much bigger, especially on the ceilings. I don't want to feel like I'm in a compact space. I also think it's what made our tiny house feel so much bigger. Here's some pictures of the cabinet layout and our selected color scheme and tile selections.


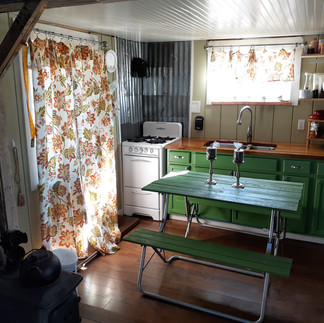


Also in the Great Room we will be adding banquette seating which will double as a L shaped sectional sofa and will also include a full sized fold out platform on which we can put an air mattress and use as a bed for guests. I recently purchased a drop leaf table so I can pull out the table to sit in front of the banquette when we have quests, either to dine or play cards, games etc. We will put our TV on a wall mount with an articulating arm so it can be seen from the kitchen or living/dining areas. Again to make ease of the electrical work with the log structure, all of our outlets will be on the exterior walls. We will have a 6ft fan in the center of the room, led can lighting and several chandeliers from the ceiling to provide LED lighting throughout. The small cabinets in the island are just there as placeholders.. as we have not decided if we will have cabinets or open shelves below, as well as the wall of cabinets behind the entry door. We actually have a hoosier cabinet that we plan to put there so I just used cabinets which were in the kitchen planner to make a "placeholder" for the space to see if it will work or not. We used masking tape on the floors to be able to envision the cupboards and other large pieces on the floor space. We will utilize some bark beetle live edge shelves in place of upper cabinets as well. I think upper cabinets tend to close the space in and in an already small kitchen I think it will be the best idea, especially since we will have a 12x12 storage area under the loft.


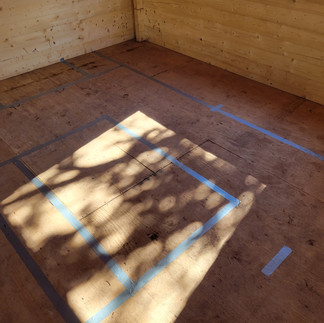


Under Loft Areas. As you can see the areas under the loft consist of 2 12x12 rooms with huge windows. The loft is 8 foot in height but the purlins holding up the loft are 8 inches. I was pondering whether I should paint the whole ceiling white or leave the purlins stained and paint the ceiling/underside of the loft floor. The room on the right will be mostly storage. Inventory for sale, kitchen/food storage, a freezer, most of my canned goods will live here as well. I haven't decided how to plot this room out so if any of you have some storage ideas, please share some! The other side of that will be my new office! It will be great not to have to share space in there but I will need something that is very functional. I do alot of computer work at this time... so something light and fun to make my desk work less depressing! I'm also thinking of a Murphy bed in there. So when My grandkids come to visit, they have a place to stay!
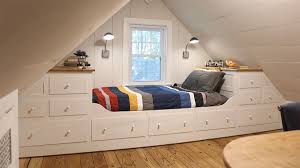
The Loft. The loft has been so challenging. I had grand plans for this loft, however, the pitch of the roof has made the space usable only in the center of the room. WIth the purlins the ceiling is so low that really the only reasonable place to put the bed is under the two big windows, and I truly hate that idea! I had even thought about putting the bed with the foot towards the windows giving enough space for maybe a low blanket box and walk space at the end and maybe a sofa table behind the headboard. So at least the breeze coming in would be enjoyable and the view as well. I have also thought about doing some built in storage on one side, deep enough to allow the headboard to have enough headroom on the side .. using the space behind and along the sides for storage.

As you can see, even storing things here will be challenging. I might hire a designer to come up with some ideas. I've browsed the web and seen things that I like but with this roof pitch. Can you imagine.. I once thought I could put a half bath up here! Who was I kidding!?? Here are some ideas out on the web that I like. Maybe some of you have some input and ideas?


So we still have a lot to finalize and its great to work at something with your spouse.. I carry a folder full of to scale drawings and we constantly are adjusting, adding and deleting and coming up with new ideas. Our new office should be all wired, heating system and plumbing in by the end of the summer. So hopefully I've spent my last winter in the tiny! I love my tiny house, but it is so nice to see the end of our project and the expansion of our business. We are both so excited!

